When I rebuilt A Passionate Plate in 2020, I wanted to pare down the collection to just the recipes I continue to make and enjoy. But, I had a hard time saying goodbye to a few special posts, so I’ve archived them here for sentimental value (recipes included).
5/12/2013 Banana Chiffon Cake & Mom’s Birthday
Happy birthday to you, happy birthday to you, happy birthday dear Mom, happy birthday to you!
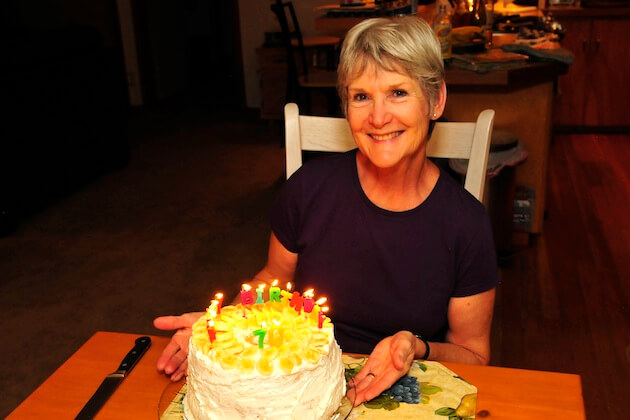
We’re visiting my parents this weekend to celebrate Mother’s Day AND my mom’s 70th birthday. Her only request for the weekend… a Chiffon cake layered with bananas and sweetened whipped cream.
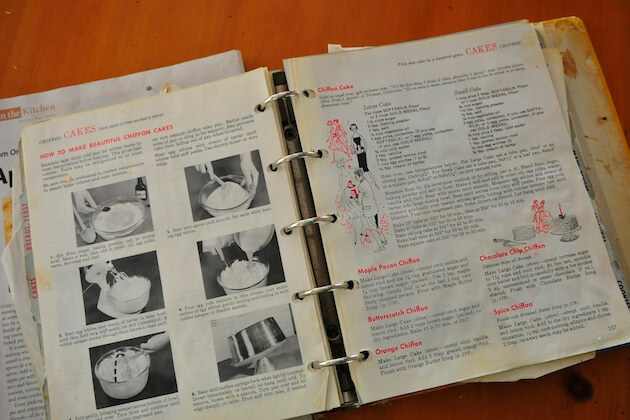
…And, we needed to use the recipe from her 1965 Betty Crocker Cookbook.
This caught me a little off guard. No chocolate? Really? I was definitely surprised. It would not have been my first choice, that’s for sure.
But, as it turns out, this is the birthday cake my Great Grandma Moore made for my mom every year. Grandma Moore ran a cake baking business out of her home in the 1950’s when Chiffon cakes were all the rage. My mother, who lived next door, would spend evenings with Grandma, watching her bake 4 or 5 Chiffon cakes every night… all kinds of flavors, shapes and sizes.
For her oldest granddaughter’s birthday, Grandma always made the same thing… a basic Betty Crocker Chiffon layered with sweetened whipped cream and bananas. And that’s exactly what we made last night.
My mom knows this recipe by heart. She could probably make it with her eyes closed. I, on the other hand, had never made a Chiffon cake.
It was a little intimidating, since I really wanted to replicate the cake from birthdays past. At first, Mom tried to stay out of the way and let me make the cake myself. But then she couldn’t help herself… she kept coming into the kitchen to see how things were going, and finally I just gave in and asked for her help.
I guess you could say we made it together. With a little help from Great Grandma Moore.
After we feasted on filet mignon, shrimp scampi and twice-baked potatoes, out came this simple, old-fashioned cake. It was a perfect end to our retro birthday celebration. Not too sweet, not too heavy, but filled with deliciousness and fond memories.
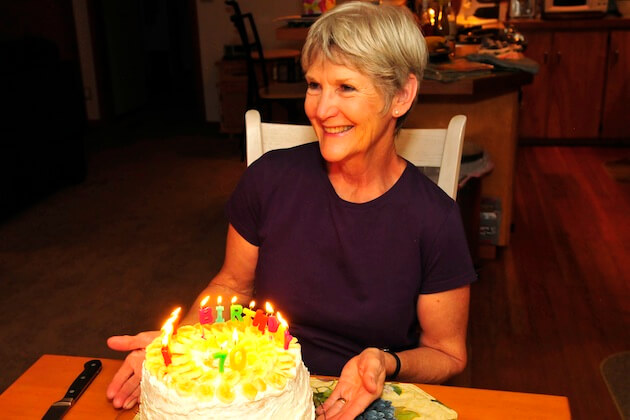
Happy Birthday, Mom! And Happy Mother’s Day to all!
Betty Crocker’s Basic Chiffon CakeRecipe Type: Cake, DessertAuthor: Betty CrockerChiffon cakes were hugely popular in the 1950’s & 1960’s. Similar to an Angel Food cake, Chiffon cakes are both light and airy and rich and buttery. You will need a 10″ tube pan for this recipe.Ingredients
- FOR THE CAKE:
- 2 1/4 cups SOFTASILK flour
- 1 1/2 cups granulated sugar
- 1 Tbsp. baking powder
- 1 tsp. salt
- 1/2 cup vegetable oil
- 5 egg yolks, unbeaten
- 3/4 cup cold water
- 2 tsp.. vanilla
- 2 tsp. grated lemon rind
- 1 cup egg whites (7 or 8)
- 1/2 tsp. cream of tartar
- FOR THE FROSTING:
- 1 quart heavy whipping cream
- 3 Tbsp. granulated sugar (or more to taste)
- 2 tsp. vanilla
- Sliced fruit of your choice.
- (Bananas are my mom’s favorite)
Instructions
- Preheat oven to 325 degrees.
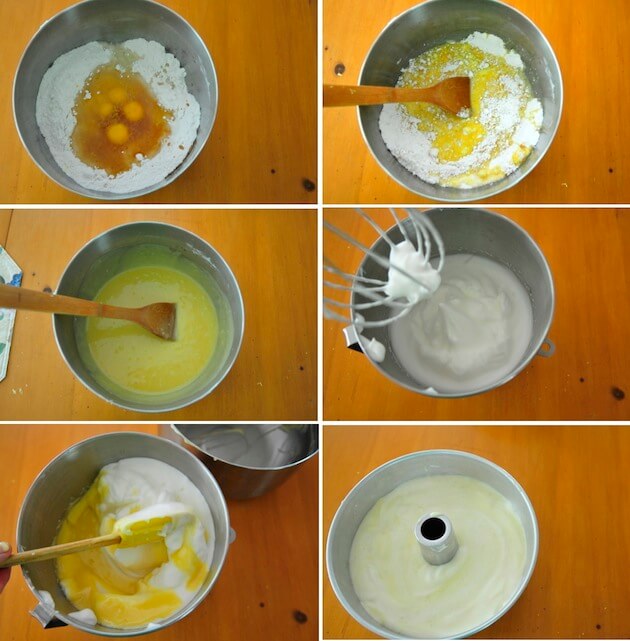
- Measure the flour, sugar, baking powder and salt into a large bowl. Stir to combine.
- Make a well in the center of the flour mixture and add, in the following order, egg yolks, water, vanilla, and lemon rind.
- Beat with a spoon, incorporating the egg mixture, until a smooth batter is formed.
- Measure egg whites and cream of tartar into the bowl of an electric mixture fitted with a ballon whisk.
- Beat the whites until they form very stiff peaks.
- Pour egg yolk mixture over the beaten egg whites and gently fold to combine with a rubber spatula, just until blended.
- Pour mixture into an UNGREASED 10″ tube pan.
- Bake for 55 minutes at 325 degrees.
- Turn oven up to 350 degrees and bake for 10 more minutes.
- Remove pan from the oven and invert onto a thin necked bottle to cool.
- Let pan hang until cold.
- Use a long bladed knife to loosen the cake around the inside and outside of the pan. Shake the cake gently to make sure it is loose, then turn out onto a cake plate.
- Cut the cake into three layers.
- Whip the heavy whipping cream in an electric mixer with the sugar and vanilla and beat until stiff.
- Frost the cake generously with whipped cream and the fruit of your choice.
2/19/2013 Brisket with Tzimmes & a Love Story
Marvin is such a romantic. And a great story-teller. Anyone who has ever shared a bottle of wine with my husband knows what I am talking about. For the rest of you, just take my word on this one.
One of Marvin’s stories I love is how his Grandpa Herman and Grandma Sadie met and fell in love onboard a ship while emigrating to the United States. Grandpa Herman was a Russian Jew traveling from Minsk and Sadie was traveling from Hungary. Somewhere along the way, after their seasickness subsided, the two met above deck and fell in love. They arrived at Ellis Island where Herman changed his last name and proposed to Sadie and that is how Herman & Sadie Milstein Miller’s life together in America began.
Or so the story goes, according to Marvin.
Yesterday as I was getting ready to prepare Brisket with Tzimmes (a recipe I had never even heard of until Sunday when Marvin described his mother’s version with such absolute fondness that I just had to try and recreate it for him) I reached out to Marvin’s sister, Marilyn, for some recipe advice.
One thing led to another in our conversation and somehow we got to the story of how Herman met Sadie. “On the boat to America, right?” I asked.
“No, no,” Marilyn laughed, “they met in East Cleveland!“
Ahhh. I see. Well, that does actually make more sense. Not quite as good of a story, though, is it? And all this time I had been picturing them in a scene from Titanic…
Well, needless to say, Sadie did emigrate to the United States from Hungary (just not on the same boat as Herman) and she was an excellent cook. Brisket with Tzimmes was one of the many recipes she made for her family and passed on to her Methodist daughter-in-law, Helen, who happened to be Marv’s mother. (Eventually Grandpa Herman began to prefer Helen’s cooking over Sadie’s, but I will leave that story for another day.)
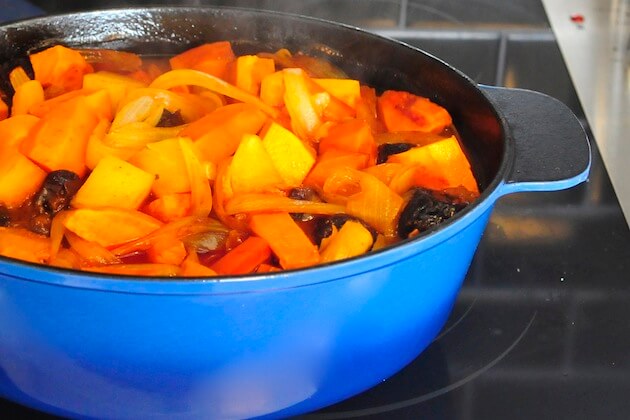
In the meantime, back to the Brisket & Tzimmes (pronounced simmis). Neither Sadie or Helen wrote down their recipes, so Marilyn couldn’t help me much. I just had to take my best guess. I read Marvin the ingredients listed in several recipes that I found online, and then just cobbled together my own version based on what he remembered.
For those of you unfamiliar with this dish, Tzimmes is a traditional Ashkenazi stew made with carrots and other root vegetables, and dried prunes or raisins. Some recipes call for orange juice and some for tomato juice. Some include vinegar. Most contain both brown sugar and honey. And, sometimes a brisket is stewed in the sauce, then sliced and served along-side the vegetables.
This isn’t something you can throw together at the last minute (although I suppose it would be easy enough to make in a slow cooker). It’s one of those recipes you start at about 3:00 pm so by the time dinner rolls around the entire house smells so good you can hardly wait to eat.
I loved making Brisket with Tzimmes for Marvin yesterday. It was fun to share a delicious meal tied together with family history and childhood memories.
And, I really love the story he tells about his grandparents meeting on the boat. If you’ve read (or watched) Life of Pi, perhaps you will agree with Marvin… why not choose the better story?
Here is my recipe for Brisket with Tzimmes – adapted from several I found online.
Brisket with TzimmesRecipe Type: Entree, Beef, Traditional Jewish DishAuthor: A Passionate PlateServes: 6+Ingredients
- 2 Tbsp. vegetable oil
- 2.5 lb. beef brisket, trimmed
- 3 small sweet potatoes or yams, peeled and chunked
- 1 large yellow onion, peeled and thinly sliced
- 3 medium carrots, peeled and thickly sliced
- 2 medium russet potatoes, peeled and chunked
- 8 oz. pitted dried prunes
- 2 cups tomato juice
- 1 cup beef broth
- 1/2 cup packed brown sugar
- 3 Tbsp. honey
- salt and pepper
Instructions
- Heat oil in a heavy bottomed Dutch oven or roasting pan with a lid.
- Season the brisket with salt and pepper. Add the brisket to the pot and brown well on both sides.
- Drain off any excess fat.
- Mix together the tomato juice, beef broth, sugar and honey.
- Spread the onions and prunes over the beef and then cover with the tomato/beef broth mixture.
- Turn the burner down to low and simmer, covered for 1 hour.
- Preheat oven to 350 degrees.
- Add the sweet potatoes, carrots and potatoes to the pot. Stir gently to cover with the sauce.
- Place the pot in the oven and cook for an additional 1 1/2 hours until the brisket is very tender.
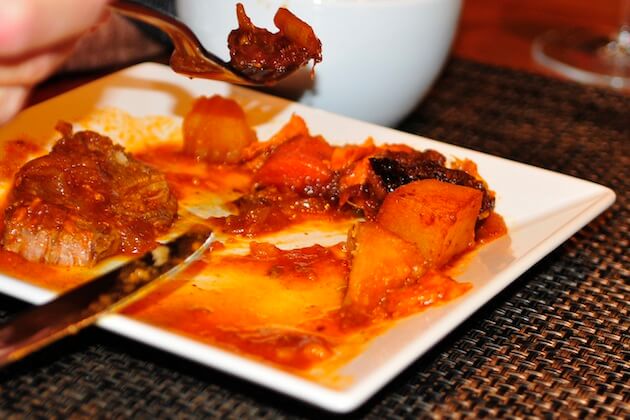
- Remove the brisket from the pot and slice against the grain. Return the meat to the pot or place it on a platter with the vegetables and sauce to serve.
- NOTE: Brisket with Tzimmes can be made in advance and reheated. It also freezes well.
6/14/2012 Homemade Hostess Cupcakes
Yesterday I made Homemade Hostess Cupcakes, and let me just say – these cupcakes were possibly the best I have ever eaten. In fact, it would not be a stretch to say that this recipe may be one of the best chocolate desserts I have ever made.

Last night they were for my dad. It was an early Father’s Day present.
My dad’s short-term memory is a little, how to say it… compromised. But he remembers the most amazing details from his childhood. Earlier this year I had a conversation with him about the foods he loved growing up. That’s when I found out, among other things, that his all-time favorite childhood snack was a Hostess Cupcake and a Nesbitt’s Orange Soda. Here is the story…
Every day after school, my dad would walk to the local mom & pop grocery, pick up a stack of The Seattle Times and deliver them to his customers on the way home (which was, of course, up a very large hill). And, if he had enough change in his pocket, my dad would treat himself to his favorite grade school snack… a Hostess Double Cupcake and a Nesbitt’s Orange Soda. My dad loved Hostess Cupcakes. I never knew! Listening to him describe the marshmallowy centers and white curly-q icing almost made me want to run out to 7-11 to pick up a twin pack, just so I could watch him eat one.
So, when I found this recipe on a beautiful blog called What Megan’s Making, I knew exactly what to get my dad for Father’s Day – his favorite childhood snack.
Only way, way better.
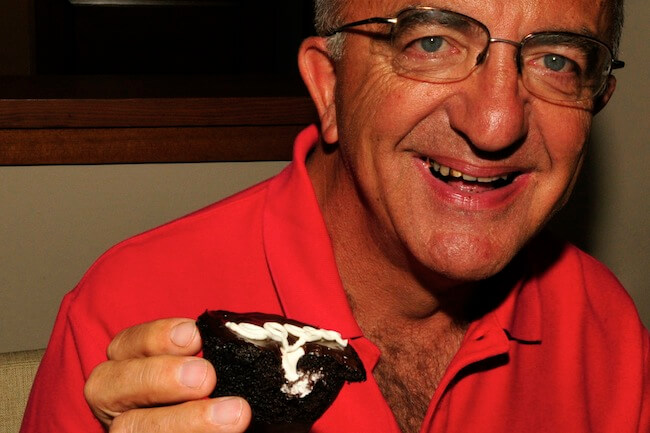
When my dad walked in the door last night, I surprised him with a platter of Homemade Hostess Cupcakes and an icy-cold orange soda. He LOVED it.
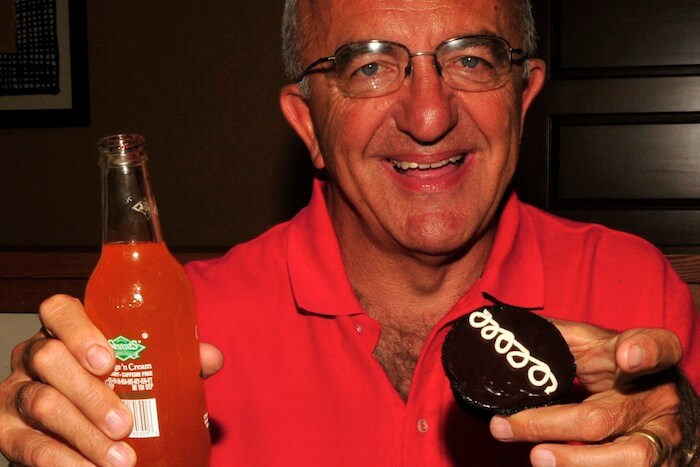
Mary, did I ever tell you this was my FAVORITE snack when I was a kid?
Yep, Dad, you told me that story. And I am so glad you did. Here, try a cupcake…
He ate four. They were even better than the ones he remembered.
I found the perfect gift.
Happy Father’s Day, Dad!
This recipe is slightly adapted from What Megan’s Making.
Serves: 18-20Possibly the best cupcakes ever. The same look as the original Hostess Cupcake, but the frosting, filling and cake are all SO MUCH better.
INGREDIENTS
- CUPCAKES
- 1 1/4 cups unbleached, all-purpose flour
- 2 tsp. baking soda
- 2 tsp. baking powder
- 1/4 tsp. salt
- 1 1/4 cups granulated sugar
- 1 cup water
- 4 ounces unsweetened chocolate, chopped
- 1 stick (8 Tbsp.) unsalted butter, cut into pieces
- 2 tsp. pure vanilla extract
- 2 large eggs, lightly beaten
- FILLING
- 4 Tbsp. unsalted butter, at room temperature
- 1 cup powdered sugar
- 1 tsp. pure vanilla extract
- 3 Tbsp. heavy cream
- 1 cup marshmallow creme
- GANACHE
- 6 ounces bittersweet chocolate, chopped
- 1/2 cup heavy cream
- 1 Tbsp. unsalted butter
- 1 tsp. pure vanilla extract
- ICING
- 4 Tbsp. butter softened
- 1 Tbsp. milk
- 1 cup powdered sugar
- 1/4 tsp. vanilla
Instructions
- Place oven rack in the center of the oven and preheat to 350.
- Spray muffin tins (18-20 muffins) with non-stick bakers spray (or line with paper liners).
- MAKE THE CUPCAKES: Place the sugar and 1 cup of water in a saucepan. Bring to a boil, stirring until the sugar dissolves, about 3 minutes. Pour the sugar into the bowl of an electric mixer or a large bowl. Add the chocolate and butter and let sit, stirring occasionally, until the chocolate is melted and the mixture has cooled slightly. Stir in the vanilla.
- Sift together the flour, baking soda, baking powder and salt in a bowl.
- Place the chocolate mixture into the bowl of an electric mixer and add the eggs, beating on medium speed until well combined, then mix in the dry ingredients on low speed until the batter is smooth.
- Divide the batter evenly between the prepared pans. Fill each muffin about 1/2 way (about 1/4 cup batter per cupcake) and bake until a toothpick inserted in the center comes out clean, about 18-20 minutes. The cupcakes will sink in the middle slightly. Cool in the pans for 25 minutes, then transfer to a rack and cool completely.
- MAKE THE FILLING. While cupcakes are cooling, make the filling. Using a mixer, cream the butter until light and fluffy. Beat in 1/2 cup confectioners’ sugar. Add the vanilla and 1 Tbsp. heavy cream and beat until smooth. Alternating between batches, beat in the remaining 1/2 cup confectioners’ sugar and 2 Tbsp. heavy cream. Beat in the marshmallow creme. Refrigerate until ready to use.
- MAKE THE GANACHE. Place the chocolate in a stainless-steel bowl. Heat the cream and 1 tablespoon butter in a saucepan until just boiling, then pour over the chocolate. Let stand for 5 minutes. Whisk until smooth. Add 1 tsp. vanilla; let stand until cool but still glossy and liquid.
- FILL THE CUPCAKES. Put the cream filling into a pastry bag fitted with a medium star tip. Insert the tip into the center of each cupcake top; fill until the cupcake is heavier (do not overfill). It’s OK if some of the filling peeks out, it will be covered by the ganache.
- FROST THE CUPCAKES. When the ganache has cooled enough to work with, spoon a Tbsp. of ganache onto each cupcake and lightly spread with an offset spatula or a knife. Chill for at least 15 minutes.
- PREPARE THE ICING. Using a mixer, beat the remaining 4 Tbsp. butter, 1/4 teaspoon vanilla, milk and confectioners’ sugar until smooth, adding more milk if needed. Spoon into a pastry bag with a small tip. Pipe the trademark curly-q’s onto the cupcakes to decorate.
- Store cupcakes in the refrigerator.
